MODS Network
Registered Users: 130,362 Users Online: 82
"A total overhaul mod changes or redefines the gameplay style of the original game, while keeping it in the original game's universe or plot." *
Latest News:
Login 

Members Online»
0 Active | 82 Guests
Online:
|
LATEST FORUM THREADS»
by supersword
Posts: 2 / 105 The Future of MODSonline
In The News by KAZAM3766
Posts: 1 / 487 CoD: Battle Royale
CoD+UO Map + Mod Releases by morgawr
Posts: 1 / 2561 Damaged .pk3's
CoD Mapping by lazygit
Posts: 1 / 3079 heli to attack ai
CoD4 SP Mapping by DrBiggzz
Posts: 11 / 984 New Cod UO Rifle Mod.
CoD Mapping |
Polls»
|
-- see more --

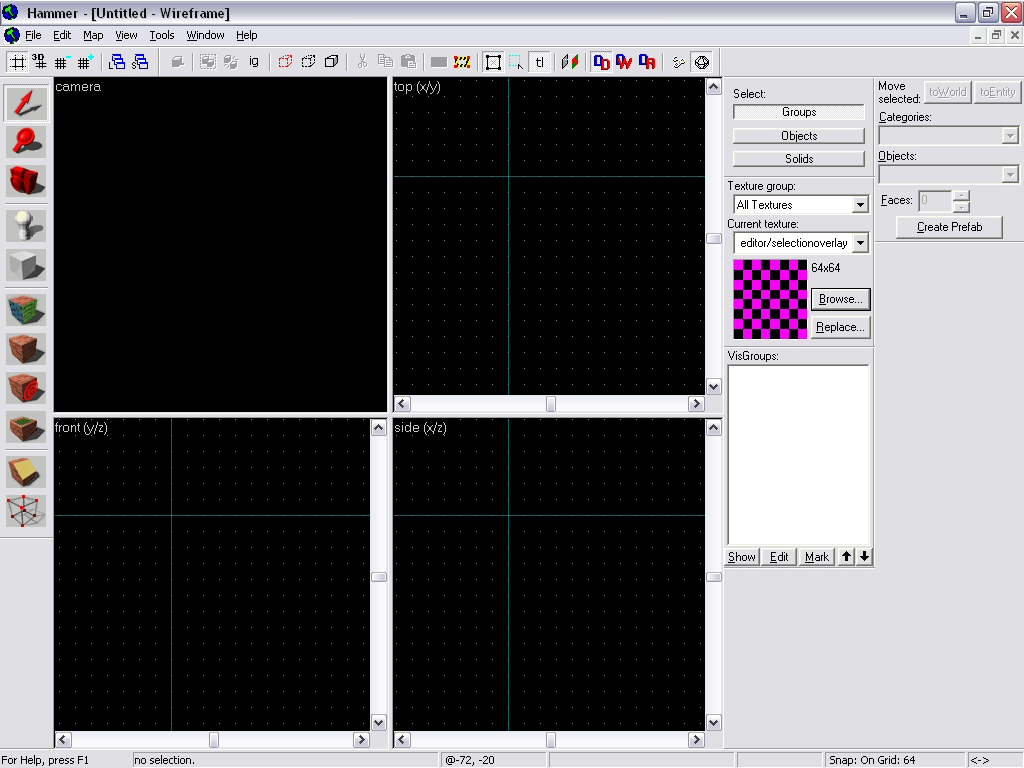
Everyone is itching to start working with Hammer, the reincarnation of Worldcraft, brought to version 4.0 by Valve Software. To start working with Hammer you will need the Source SDK, available via Steam. This guide does not include how to install the SDK.
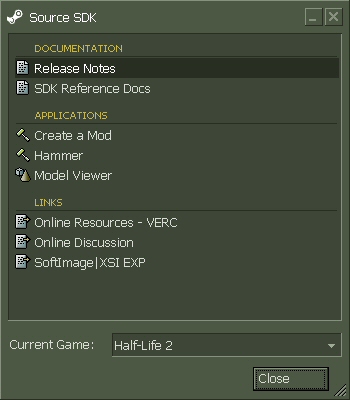
Go to your "Play Games" window and open up the SDK (see picture below). Launch Hammer and proceed to click Tools>Options and click on the Game Configurations tab first. This is one of the first things you should setup because it contains all the information you will need to create and compile maps. The first drop-down box at the top contains readily made profiles for each of the three games currently available (Counter-strike, Half-Life 2 and HL2: Deathmatch). For this guide we will use Half-Life 2, however it is virtually the same for all games and configurations.
Below this list is an area that contains the paths to your *.FGD files. These files contain game-specific information and change how and what you can do with the editor itself, such as Counter-strike specific entities which are not found in regular Half-Life. By default, when you change one of the above profiles it will change this window to load the proper *.FGD file. If you are unsure of which file is loaded, click Remove and then Add the file for the game you wish to modify.
The next section includes Texture Format, which is where things can be fuzzy for new mappers. Materials are going to be used for mapping with the Source engine (HL2, etc.) while WAD3 files will be used for classic Half-Life and mods. Since this guide is for HL2, select Materials if it is not already selected. For map type, choose Half-Life 2.
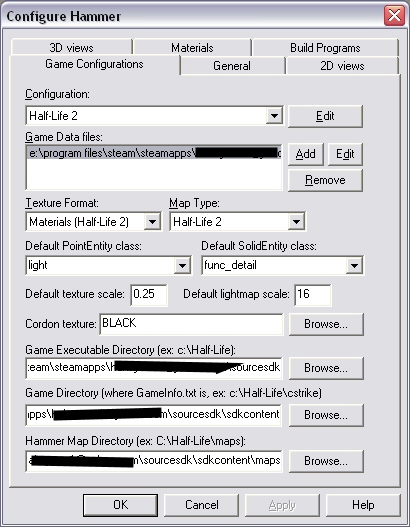
The next section is not necessary, but useful. When you create an entity, it will be assigned a function by default using this box. Default PointEntity Class should be changed to light. This should be enough for now or change the others as necessary. The bottom has three paths, these should be automatically be filled in when you change profiles, however you can see the paths if they are not in the screenshot provided.
Moving on to the General tab, make sure Use independent window configurations is unchecked by default. What this does is it will allow you to change each window, however there are a lot of problems people create when they change their windows, such as not getting them back. If you do decide to use different window configs, uncheck this box and it will reset them. Do this if you have a problem, otherwise I actually recommend using different window configurations sometimes. To help maximize workspace, you may also click the panels on the right side and move them under each other.

Click the 2D Views tab and prepare to be amazed! Most of the actual basic options on how you want to view your window are on this page, including color scheme. The first box is Crosshair Cursor, essentially it does what it says (turns your cursor into a crosshair). The next box Arrow keys nudge selected object/vertex is actually a useful feature, however this will disable using the arrow keys to run around in the 3D camera. For the sake of how helpful it is, check this box for now and when working, you don't use it a lot you may just prefer to uncheck the box and use it for camera keys in the 3D window. Default to 15 degree rotations should be checked as this will allow you to turn objects and rotate them by 15 degrees at a time, very useful and if you need manual rotation, you can transform your object through the menus or hotkeys. Reorient primitives on creation in the active 2D window can be useful and is really a matter of preference, but be careful using this at first as it may disorient the user as to how the object is actually positioned. If you find yourself running out of room, you can disable the scrollbars by making sure Display scrollbars is unchecked. Automatic infinite selection in 2D windows is an option where you will not have to press the 'Enter' key to select multiple objects in the 2D windows. This is mostly a matter of preference, but you may find leaving this box cleared will keep you from selecting unwanted objects in the future. Draw vertices simply draws small boxes where two or more points connect to make a vertex, essentially making it very easy to see corners and manipulate vertices in the 2D window. It is recommended to leave this box checked.
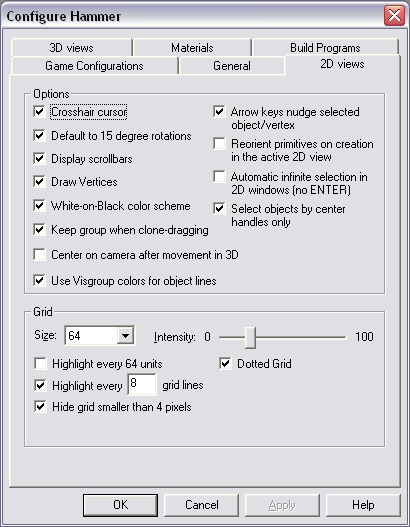
By default, Hammer has always used a black background with colors that stand out over it, which actually works pretty well (even if you prefer black-on-white schemes) and is recommended, but mostly preference. Please note there are no other color schemes for the Hammer Editor. Select objects by center handles only will keep you from selecting unwanted objects in the 2D windows. Using this option, which is recommended, will allow you to only select objects by clicking the little 'X' drawn in the middle of each object. Keep group when clone-dragging simply means when you clone a grouped object, it will keep the new objects grouped while you drag them, keep this checked. Center on camera after movement in 3D window essentially keeps centered on the camrea, an option that is once again mostly preference. Use VisGroup colors for object lines colors a VisGroup (a special type of group) with a certain color, useful for telling groups apart from one another while on a complex project. For ease of use, keep the box checked. Move down to the Grid area and to start, put the grid to a size of 64 by default. This option may be too high or too low for some mappers, but for starters 64 should suffice. You will want to Highlight every few units. With a grid-size of 64, highlighting every (8) eight grid lines is efficient. Also hide grid smaller than 4 units for simplicity. A dotted grid is recommended, intensity is a matter of preference (default is about 25% of the bar to the left).
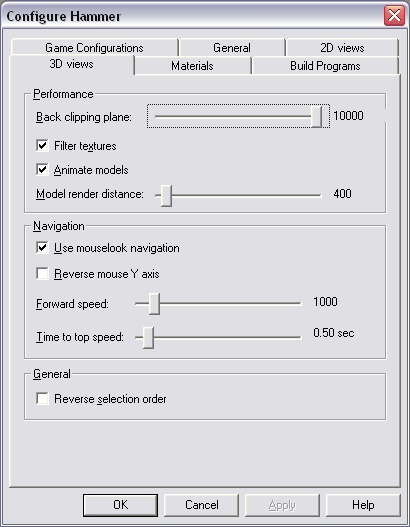
Moving now to the 3D views page, the first thing you see is an adjustable bar and you will probably want to push it all the way to the right (10,000 units). This is how far in the 3D window to display objects before it clips them. Most computers should have no problem with this, however if it seems laggy you may try lowering it by 25% ticks to work comfortably, increasing when necessary. You should be able to work with animated models so check that box along with filter textures. To reduce lag, around 400 units will be sufficient in the camera window for model rendering distance, adjust as necessary. You'll probably want to use mouselook for navigation, you can change the Y-axis if you're strange...Forward speed is straight-forward, you may want to decrease this some as default is about half-way, but this is preference. The time to top speed option controls how long it takes to reach full speed with the camera, again preference. Reverse selection order does just what it says and is unchecked by default.
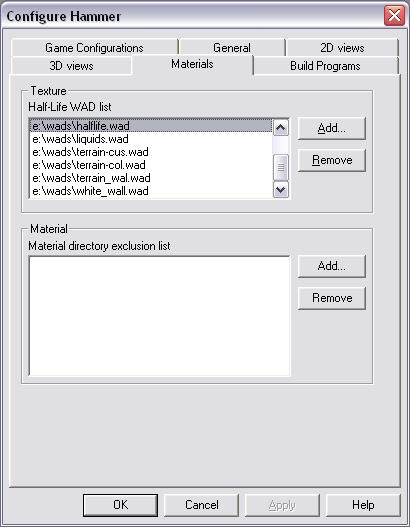
Next is the Materials page where you can add WAD3 texture packs, used by the original Half-Life, if you plan to use Hammer for mapping legacy-fashion. By default, Hammer automatically found these files on my computer, but if you have some you wish to include you had better check this section to start with. The bottom window is for excluding material lists. This must mean that Hammer actually knows to check the SteamApps for the materials, so if you have items you wish not to use you should add them to the directory exclusion list on this window.
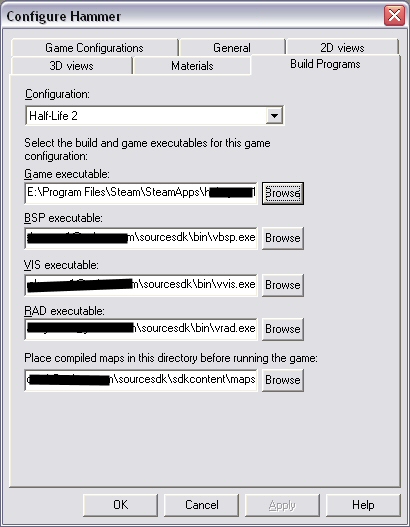
The last page to setup is the Build Programs tab, which should be familiar to anyone who has mapped before. If you do not know the process of map-making, then you must know for a HL2 map you will need a BSP, VIS, and RAD program to compile your finished product. Valve Software has included some potentially great tools to do this with and their use is way beyond the scope of this guide, however we will go over where to locate these files for use. First, select the game you will be compiling (and mapping) for at the top. For this guide, we selected HL2 of course. Game executable will be "hl2.exe" and can be found by default at C:\Program Files\Steam\SteamApps\email@address.com and then the HL2 directory. The executables will be found at C:\Program Files\Steam\SteamApps\email@address.com\sourcesdk\bin, this should include vbsp.exe, vvis.exe, vrad.exe. Place the paths to the files according to the field (bsp goes in the bsp box, vvis goes in the vvis box and vrad goes in the vrad box). The last box is where your maps will go when they are compiled, by default C:\Program Files\Steam\SteamApps\email@address.com\sourcesdk\sdkcontent\maps. It is recommended leaving this as the path for the compiled maps so they are always where you put them. When you are finished, copy or move the compiled map to the appropriate game directory to load the map and/or debug or playtest.
Congratulations! You have successfully setup the Valve Hammer Editor, now get busy!
Below this list is an area that contains the paths to your *.FGD files. These files contain game-specific information and change how and what you can do with the editor itself, such as Counter-strike specific entities which are not found in regular Half-Life. By default, when you change one of the above profiles it will change this window to load the proper *.FGD file. If you are unsure of which file is loaded, click Remove and then Add the file for the game you wish to modify.
The next section includes Texture Format, which is where things can be fuzzy for new mappers. Materials are going to be used for mapping with the Source engine (HL2, etc.) while WAD3 files will be used for classic Half-Life and mods. Since this guide is for HL2, select Materials if it is not already selected. For map type, choose Half-Life 2.
The next section is not necessary, but useful. When you create an entity, it will be assigned a function by default using this box. Default PointEntity Class should be changed to light. This should be enough for now or change the others as necessary. The bottom has three paths, these should be automatically be filled in when you change profiles, however you can see the paths if they are not in the screenshot provided.
Moving on to the General tab, make sure Use independent window configurations is unchecked by default. What this does is it will allow you to change each window, however there are a lot of problems people create when they change their windows, such as not getting them back. If you do decide to use different window configs, uncheck this box and it will reset them. Do this if you have a problem, otherwise I actually recommend using different window configurations sometimes. To help maximize workspace, you may also click the panels on the right side and move them under each other.
Click the 2D Views tab and prepare to be amazed! Most of the actual basic options on how you want to view your window are on this page, including color scheme. The first box is Crosshair Cursor, essentially it does what it says (turns your cursor into a crosshair). The next box Arrow keys nudge selected object/vertex is actually a useful feature, however this will disable using the arrow keys to run around in the 3D camera. For the sake of how helpful it is, check this box for now and when working, you don't use it a lot you may just prefer to uncheck the box and use it for camera keys in the 3D window. Default to 15 degree rotations should be checked as this will allow you to turn objects and rotate them by 15 degrees at a time, very useful and if you need manual rotation, you can transform your object through the menus or hotkeys. Reorient primitives on creation in the active 2D window can be useful and is really a matter of preference, but be careful using this at first as it may disorient the user as to how the object is actually positioned. If you find yourself running out of room, you can disable the scrollbars by making sure Display scrollbars is unchecked. Automatic infinite selection in 2D windows is an option where you will not have to press the 'Enter' key to select multiple objects in the 2D windows. This is mostly a matter of preference, but you may find leaving this box cleared will keep you from selecting unwanted objects in the future. Draw vertices simply draws small boxes where two or more points connect to make a vertex, essentially making it very easy to see corners and manipulate vertices in the 2D window. It is recommended to leave this box checked.
By default, Hammer has always used a black background with colors that stand out over it, which actually works pretty well (even if you prefer black-on-white schemes) and is recommended, but mostly preference. Please note there are no other color schemes for the Hammer Editor. Select objects by center handles only will keep you from selecting unwanted objects in the 2D windows. Using this option, which is recommended, will allow you to only select objects by clicking the little 'X' drawn in the middle of each object. Keep group when clone-dragging simply means when you clone a grouped object, it will keep the new objects grouped while you drag them, keep this checked. Center on camera after movement in 3D window essentially keeps centered on the camrea, an option that is once again mostly preference. Use VisGroup colors for object lines colors a VisGroup (a special type of group) with a certain color, useful for telling groups apart from one another while on a complex project. For ease of use, keep the box checked. Move down to the Grid area and to start, put the grid to a size of 64 by default. This option may be too high or too low for some mappers, but for starters 64 should suffice. You will want to Highlight every few units. With a grid-size of 64, highlighting every (8) eight grid lines is efficient. Also hide grid smaller than 4 units for simplicity. A dotted grid is recommended, intensity is a matter of preference (default is about 25% of the bar to the left).
Moving now to the 3D views page, the first thing you see is an adjustable bar and you will probably want to push it all the way to the right (10,000 units). This is how far in the 3D window to display objects before it clips them. Most computers should have no problem with this, however if it seems laggy you may try lowering it by 25% ticks to work comfortably, increasing when necessary. You should be able to work with animated models so check that box along with filter textures. To reduce lag, around 400 units will be sufficient in the camera window for model rendering distance, adjust as necessary. You'll probably want to use mouselook for navigation, you can change the Y-axis if you're strange...Forward speed is straight-forward, you may want to decrease this some as default is about half-way, but this is preference. The time to top speed option controls how long it takes to reach full speed with the camera, again preference. Reverse selection order does just what it says and is unchecked by default.
Next is the Materials page where you can add WAD3 texture packs, used by the original Half-Life, if you plan to use Hammer for mapping legacy-fashion. By default, Hammer automatically found these files on my computer, but if you have some you wish to include you had better check this section to start with. The bottom window is for excluding material lists. This must mean that Hammer actually knows to check the SteamApps for the materials, so if you have items you wish not to use you should add them to the directory exclusion list on this window.
The last page to setup is the Build Programs tab, which should be familiar to anyone who has mapped before. If you do not know the process of map-making, then you must know for a HL2 map you will need a BSP, VIS, and RAD program to compile your finished product. Valve Software has included some potentially great tools to do this with and their use is way beyond the scope of this guide, however we will go over where to locate these files for use. First, select the game you will be compiling (and mapping) for at the top. For this guide, we selected HL2 of course. Game executable will be "hl2.exe" and can be found by default at C:\Program Files\Steam\SteamApps\email@address.com and then the HL2 directory. The executables will be found at C:\Program Files\Steam\SteamApps\email@address.com\sourcesdk\bin, this should include vbsp.exe, vvis.exe, vrad.exe. Place the paths to the files according to the field (bsp goes in the bsp box, vvis goes in the vvis box and vrad goes in the vrad box). The last box is where your maps will go when they are compiled, by default C:\Program Files\Steam\SteamApps\email@address.com\sourcesdk\sdkcontent\maps. It is recommended leaving this as the path for the compiled maps so they are always where you put them. When you are finished, copy or move the compiled map to the appropriate game directory to load the map and/or debug or playtest.
Congratulations! You have successfully setup the Valve Hammer Editor, now get busy!
Latest Syndicated News»
Comments: 5
Codutility.com up and runn...
Nice, and there still using the logo and template for the screenshots, which... Comments: 5
Codutility.com up and runn...
dundy writes...Quote:Call of Duty modding and mapping is barly alive only a ... Comments: 5
Codutility.com up and runn...
Mystic writes...Quote:It seems to me the like the site is completely dead?
... Comments: 5
Codutility.com up and runn...
It seems to me the like the site is completely dead? Comments: 5
Codutility.com up and runn...
Yeeaahhhh.........
|
Latest Downloads»
OHMY Don Quixote
Call of Duty 2: Maps: Multiplayer (5.76Mb) OHMY Neuburg
Call of Duty 2: Maps: Multiplayer (6.84Mb) OHMY Tebessa
Call of Duty 2: Maps: Multiplayer (7.36Mb) OHMY POW Camp
Call of Duty 2: Maps: Multiplayer (2.15Mb) OHMY Valley
Call of Duty 2: Maps: Multiplayer (5.7Mb) |
Partners & Friends»
|

Site Links and Information
|
Partners
|
Friends
|
Copyright © MODSonline LLC
Tresware Content Management System © 2011
Website Designed by LKFX and Developed by Tresware